Integrate a complete backend into your Biela.dev application with Supabase.
Biela.dev’s native Supabase integration allows you to manage your entire application in one place. You can design your app’s interface, define its logic, and connect it to a secure, scalable database through a simple, guided chat experience. No code setup, no backend headaches, and no switching between tools. Whether you are a creator, founder, or first-time app builder, this integration helps you build and launch a production-ready web or mobile app with ease.
Overview
Supabase is an open-source alternative to Firebase, built on top of PostgreSQL. It offers a complete suite of backend tools including real-time databases, authentication, file storage, and serverless functions.
By connecting Supabase to your Biela.dev project, you get a fully managed backend without writing a single line of SQL or backend code. Biela automatically sets up your database, handles authentication, and connects everything seamlessly to your front-end.
You focus on building a great experience for your users, while Biela ensures that every part of your app is powered by a secure and reliable infrastructure.
What Supabase Unlocks in Biela.dev
Biela automatically creates and links your Supabase tables based on your prompts. Just describe your data (for example, “I want to store user feedback”), and Biela will generate the schema instantly.
Add secure login and sign-up flows with a single prompt. Biela can integrate email/password, social login, or magic link authentication without any setup work.
Enable users to upload and manage images, videos, or other files using Supabase Storage. This is ideal for profile photos, documents, or any app that handles media.
Build apps that stay in sync as data changes. Supabase’s real-time capabilities let you create live dashboards, chats, and collaboration tools effortlessly.
- Edge Functions (Serverless)
Need custom backend logic? Biela can generate Supabase Edge Functions for you. These can handle automated emails, payment processing, or API integrations with minimal effort.
Why Use Supabase with Biela.dev
Building an app traditionally means juggling multiple tools: a front-end builder, a database setup, authentication, and deployment. Each tool has its own learning curve and setup process.
Biela.dev removes that complexity. When you type:
Create a task manager app with user accounts and real-time updates.
biela will:
- Design your user interface.
- Set up a live Supabase database.
- Add authentication flows.
- Deploy everything together in one connected project.
For non-technical users, this means you can build complex apps without writing code.
For developers, it means less boilerplate and much faster delivery.
Getting Started with Supabase in Biela.dev
You will need two things before starting:
- A free Supabase account - Sign Up Now
- An existing Biela.dev project
Once you have both, follow these steps.
Step 1: Create a Supabase Account
Step 2: Create an Organization in Supabase
- Log in to https://supabase.com
- After logging in, you will be prompted to create a new organization.
- Choose any name you like (for example, “Personal”).
- You do not need a paid plan to use biela.dev. The free tier allows up to 2 projects.
- When prompted to create a new database, you can skip this step by clicking Cancel.
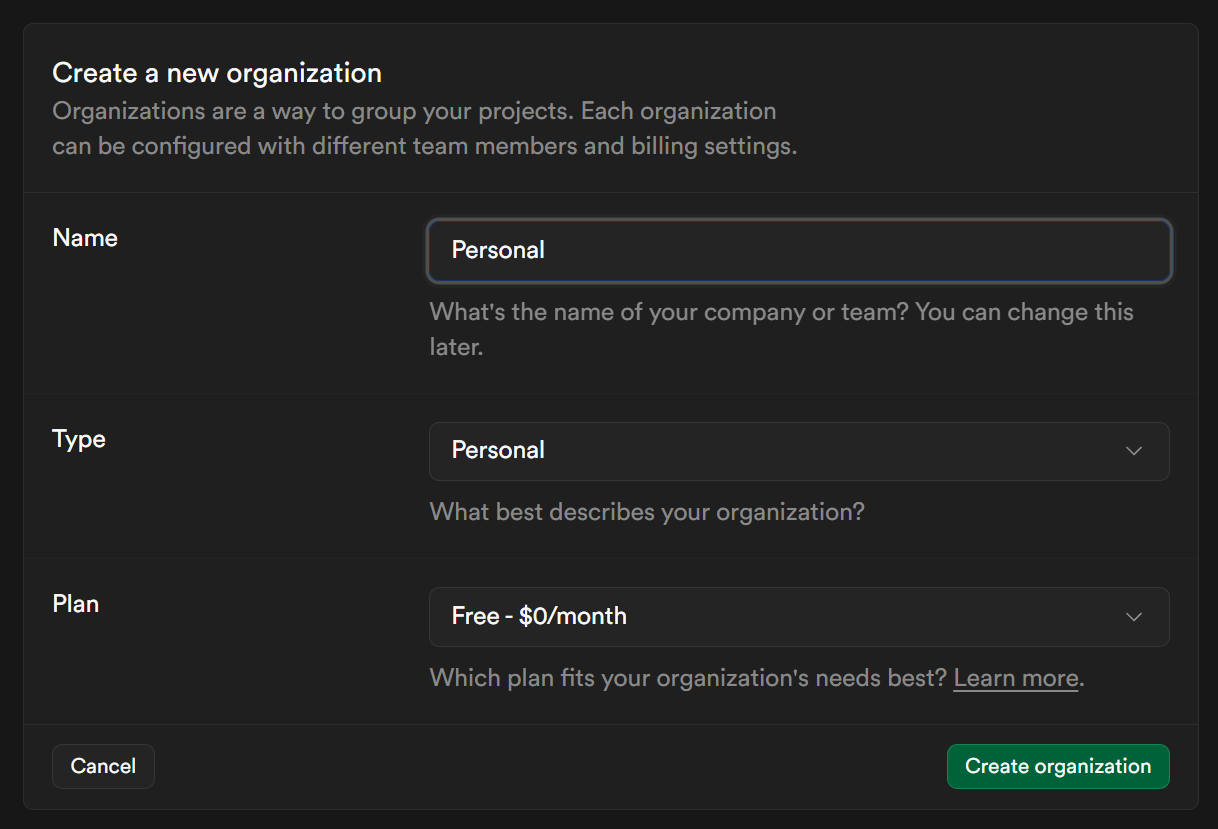
Your Supabase account is now ready to connect.
Step 3: Connect Supabase to Your Biela.dev Project
1. Open your biela.dev project.
2. Click the “Code” button in your project toolbar.
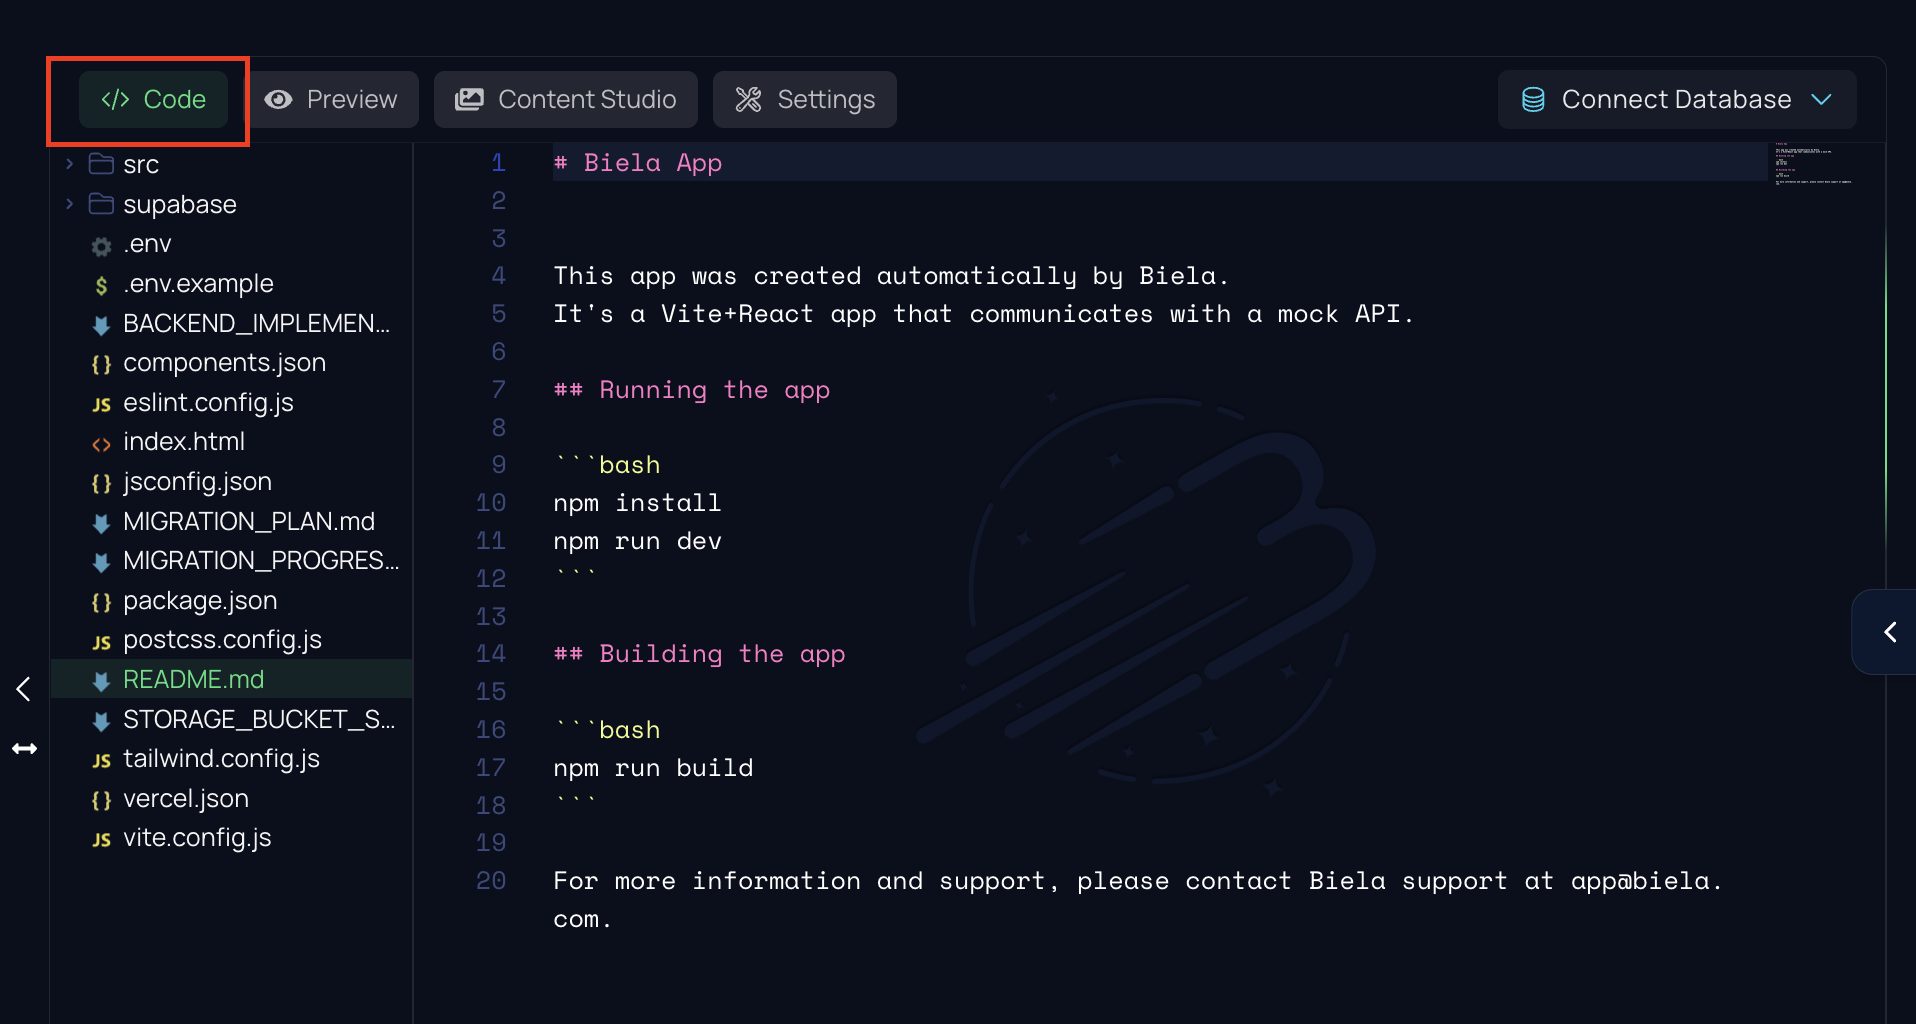
3. On the right-hand side, select “Connect Database.”
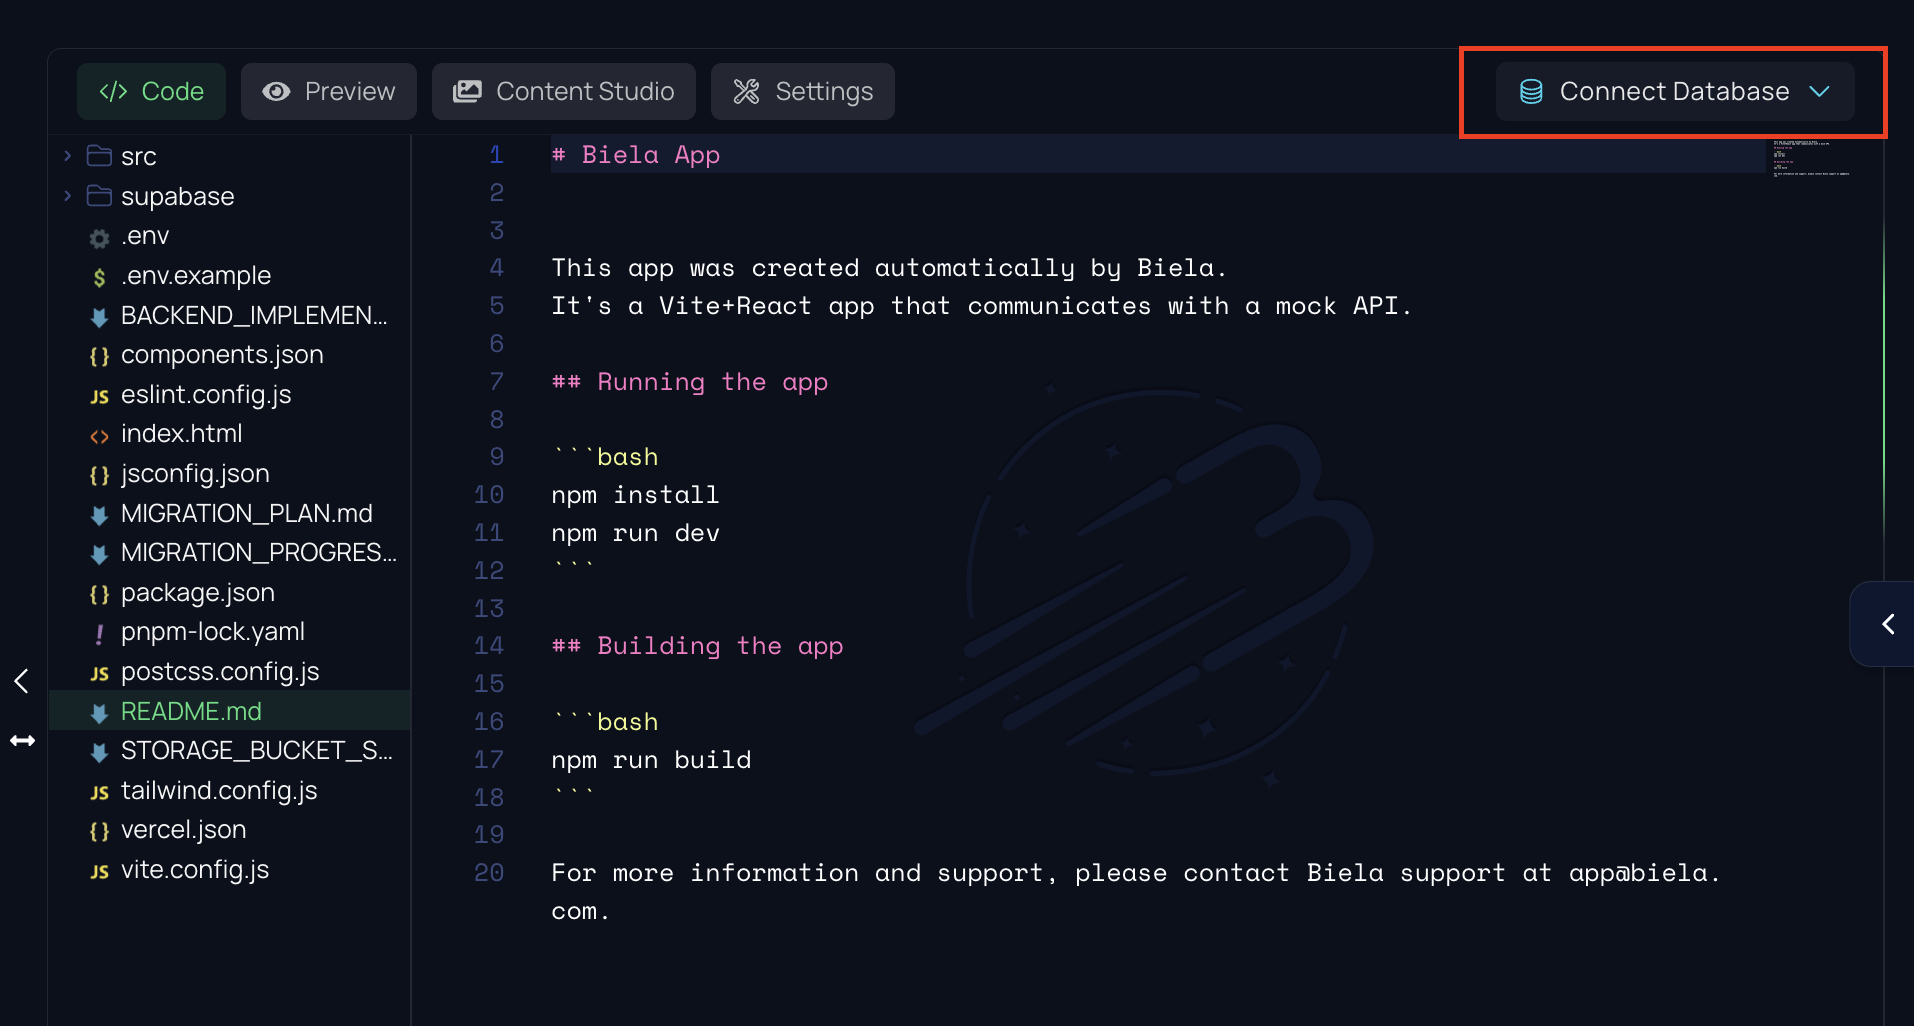
4. A new tab will open, asking for permission to connect biela.dev to your Supabase account.
5. Click “Authorize Biela.dev.”
Step 4: Start Building
After the setup completes, you can immediately start creating your app’s features. For example:
- Ask Biela to “Add a feedback form and save submissions to the database.”
- Biela will generate the form UI, connect it to your Supabase database, and handle all the backend logic.
Within minutes, your app will have a fully functional backend and a polished front-end ready for real users.
Adding User Authentication
Once your Biela.dev project is connected to Supabase, you can enable user accounts, login, and access control with minimal effort.
Email & Password Authentication (Basic Setup)
Prompt Biela to add login/signup flows
In your Biela chat interface, write a prompt like:
Add login and signup pages
1. Biela will generate:
- A signup page (name, email, password inputs)
- A login page
- Backend wiring to Supabase Auth
- Session handling and redirection logic
2. Register users via the app
Open the signup page in your app and create a new account. Supabase will store it securely.
3. Or add users manually (for testing)
In your Supabase dashboard, navigate to Authentication → Users, and manually add an email + password user.
4. Disable email confirmation temporarily (optional for dev)
In Supabase dashboard: Authentication → Settings → Email, disable “confirm email.” This lets new users log in immediately without having to verify.
(Re-enable this when you move to production for security.)
5. Route protection & gated pages
After authentication is set up, biela will automatically guard pages so that only logged-in users can access certain features. You can also instruct:
Protect /dashboard page so only authenticated users see it
6. Customize the UI
You can prompt Biela to restyle login/signup forms to match your branding and add extra input fields (e.g. full name, profile picture).
Social / OAuth Login (Google, GitHub)
1. Enable provider(s) in Supabase
In Supabase dashboard: Authentication → Providers
- Toggle on Google, GitHub, or others
- Add the required Client ID and Client Secret from the provider account
2. Tell Biela to add social login buttons
Example prompt:
Add “Sign in with Google” to the login page
3. Biela will update your UI and integrate the OAuth flow via Supabase.
4. Configure redirect / site URLs
Supabase requires correct Site URL settings so OAuth flow returns users to your app. Make sure to set your app’s domain or preview URL under Authentication → Settings → Site URL in Supabase.
5. Test social login end-to-end
Click “Sign in with Google” in your app, authenticate via Google, and confirm you land back as a logged-in user.
Managing Data with Supabase
Once your project is connected to Supabase, Biela.dev allows you to define, manage, and update your app’s data structure directly through natural language prompts. You no longer need to write SQL manually, configure migrations, or worry about database setup. Simply describe what you want, and Biela will generate the schema, run the migrations, and link your database to your app automatically.
Biela’s integration ensures your data layer and front-end remain perfectly synchronized, making database management accessible even to non-technical builders.
Creating Tables and Managing Schemas
1. Describe Your Data Model
To create your first table, just describe what kind of data you want to store.
For example, try prompting:
Create a table for projects with fields:
• title
• description
• deadline
• status
Biela will automatically:
- Generate the PostgreSQL schema for your new table
- Create a migration file behind the scenes
- Apply the migration to your connected Supabase database
- Link your project’s front-end to the new data model
After running the migration, Biela will confirm that your table is ready to use.
2. Review the Generated SQL
Biela always gives you transparency and control. Before applying changes, you can review the generated SQL snippet to understand what’s being created.
Example output:
create table if not exists projects (
id uuid primary key default gen_random_uuid(),
title text not null,
description text,
deadline date,
status text default 'pending',
created_at timestamp default now()
);
If you want to manually verify or run the query yourself:
- Open your Supabase Dashboard
- Go to SQL Editor → New Query
- Paste the SQL snippet Biela generated
- Click Run to apply the table creation manually
This optional step gives you complete visibility into your database setup.
3. Verify in Supabase
Once the table is created (automatically or manually), you can verify it inside your Supabase dashboard:
- Open Database → Tables
- Find your new projects table
- Click to explore its columns, data types, and structure
From here, you can also manually add test data or make quick adjustments if needed.
Updating Tables
If your project grows and you need new fields, just tell Biela what to add or modify.
Example:
Add a priority field (integer) to the projects table.
Biela will generate an ALTER TABLE migration like this:
alter table projects
add column priority integer default 1;
After showing you the SQL, Biela will automatically apply it to your Supabase database once you confirm.
Your app will immediately reflect the change — no need to touch any backend code or redeploy your database.
Working with Relationships
Supabase supports foreign keys and relationships, and Biela makes them simple to set up.
Example prompt:
Create a tasks table where each task belongs to a project.
Biela will automatically:
- Create a new tasks table
- Add a project_id foreign key referencing projects
- Set up cascading deletes for consistency
- Apply the migration to your database
Generated SQL:
create table if not exists tasks (
id uuid primary key default gen_random_uuid(),
project_id uuid references projects(id) on delete cascade,
title text not null,
completed boolean default false,
created_at timestamp default now()
);
This instantly connects your projects and tasks data models so you can query related records without extra setup.
Accessing and Displaying Data in Your App
Biela automatically handles the connection between your Supabase database and your app’s interface.
After creating your tables, you can prompt:
Display all projects and their tasks in a list on the dashboard.
Biela will:
- Query Supabase for all projects and related tasks
- Generate a dynamic UI that lists them
- Include loading, error, and empty states
- Keep the data in sync in real time
You can further refine the view with prompts like:
Show only active projects with deadlines in the next 7 days
Managing Data Directly in Supabase
If you prefer to inspect or manage your data manually, you can do so from the Supabase dashboard:
- Go to Table Editor
- Select your table (e.g., projects or tasks)
- Add, edit, or delete rows as needed
- Use the SQL Editor for advanced queries
Any change you make here remains in sync with Biela.dev.
Example Workflow
Let’s look at a complete flow from schema creation to displaying data:
1. Prompt in Biela:
Create a project management system with projects and tasks. Each project can have multiple tasks.
2. Biela automatically:
- Generates both projects and tasks tables with relationships
- Runs migrations on your connected Supabase instance
- Sets up a dashboard UI for managing and viewing projects
- Connects the app’s data flow to Supabase in real time
3. Result:
You have a working project management backend and front-end ready for testing within minutes.
File Storage (Images & Media)
With Supabase integrated into your Biela.dev project, handling images, videos, and other files becomes effortless. Biela connects your app directly to Supabase Storage, a secure and scalable object storage system built for modern apps.
You can easily let users upload profile pictures, project attachments, or any other media files without writing complex upload logic. Biela automatically sets up everything you need: storage buckets, file access rules, and front-end components for uploading, previewing, and retrieving files.
Uploading and Displaying Files
After setup, users can upload and view images directly from your app.
Example flow:
- User opens the project creation form
- They click “Upload Image” and select a file
- The image is automatically uploaded to Supabase Storage
- The file’s public or signed URL is stored in the project’s database record
- The uploaded image is displayed in the project card or dashboard view
You can prompt Biela to customize the upload experience:
Show a preview of the uploaded image before saving the project.
Or
Allow users to delete the project’s image from storage when the project is deleted.
Biela will automatically handle these logic connections for you.
Manually Managing Files in Supabase
You can view, upload, or delete files directly in your Supabase dashboard if needed:
- Go to Storage → Buckets → [Your Bucket Name]
- Click Upload File to manually add media
- Use the Public URL or Signed URL to reference it in your app
- Delete files when they are no longer needed
All changes made directly in Supabase will stay in sync with your Biela.dev project.
Example Workflow
Let’s take a full example of how this works in practice:
1. Prompt in Biela:
Add an image upload option for each project and show the image in the project dashboard
2. Biela automatically:
- Creates a Supabase Storage bucket called project-images
- Adds an upload field to the project form
- Updates your database schema with a cover_image_url column
- Connects the upload component to the storage bucket
- Displays the uploaded image in the project list and details view
3. Result:
Every project now supports uploading, storing, and displaying images.
You can manage these files in both Biela.dev and Supabase without writing any backend logic.